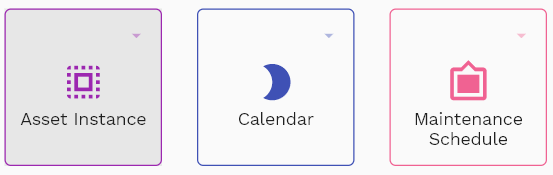
Asset Instance
This documentation is incomplete.
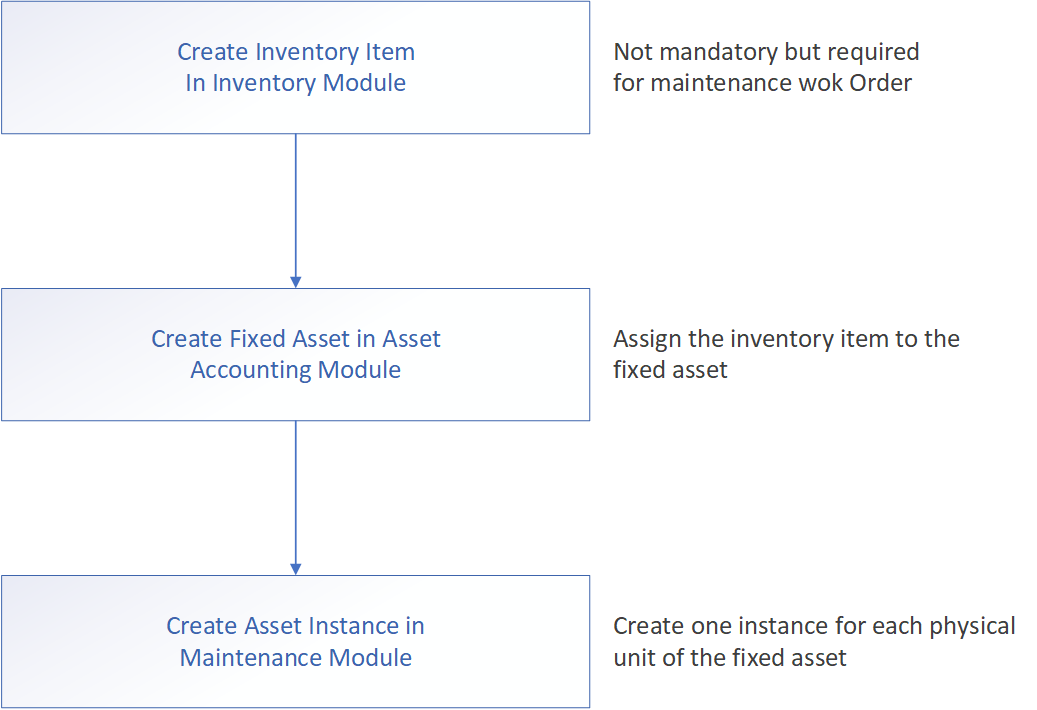
A fixed asset is a long-term asset that an organization owns and uses for regular business activities. You can create a fixed asset for a specific purpose, such as a building, a vehicle, or a computer. Fixed assets are created and tracked in the fixed asset accounting module.
A fixed asset instance is a specific instance of a fixed asset with a unique instance number. Asset instances are required for creating maintenance schedules and maintenance work orders.
You must assign an inventory organization, an inventory item number, and a maintenance work definition to each asset instance. All these attributes are required when you create a maintenance work order.
Using the asset instance screen, you can create, edit, and manage all the attributes of an asset instance.
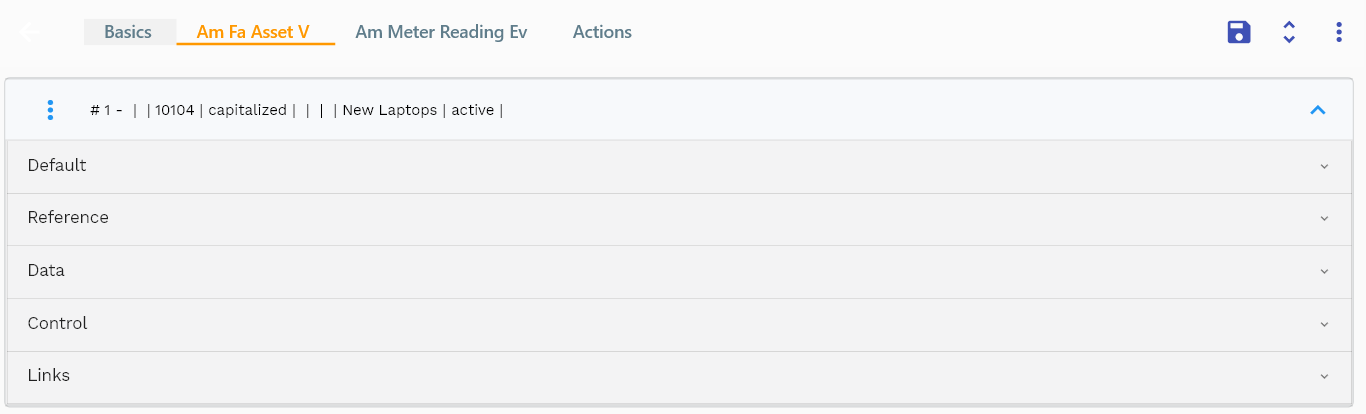
The default fixed asset screen consists of four tabs. However, you can customize the screen by adding, deleting, or reordering tabs.
- Basic tab - shows basic information about the asset such as asset instance, such as asset number, inventory organization, etc
- FA Asset view - shows the fixed asset information entered in the fixed asset accounting screen
- Meter reading - shows the information entered in the meter reading screen. You can add or delete meter readings directly from this screen.
- Actions - shows the actions that can be performed on the asset instance.
In InoERP, assets are created and maintained at a legal organization level. However, asset instances are created and maintained at the inventory organization level.
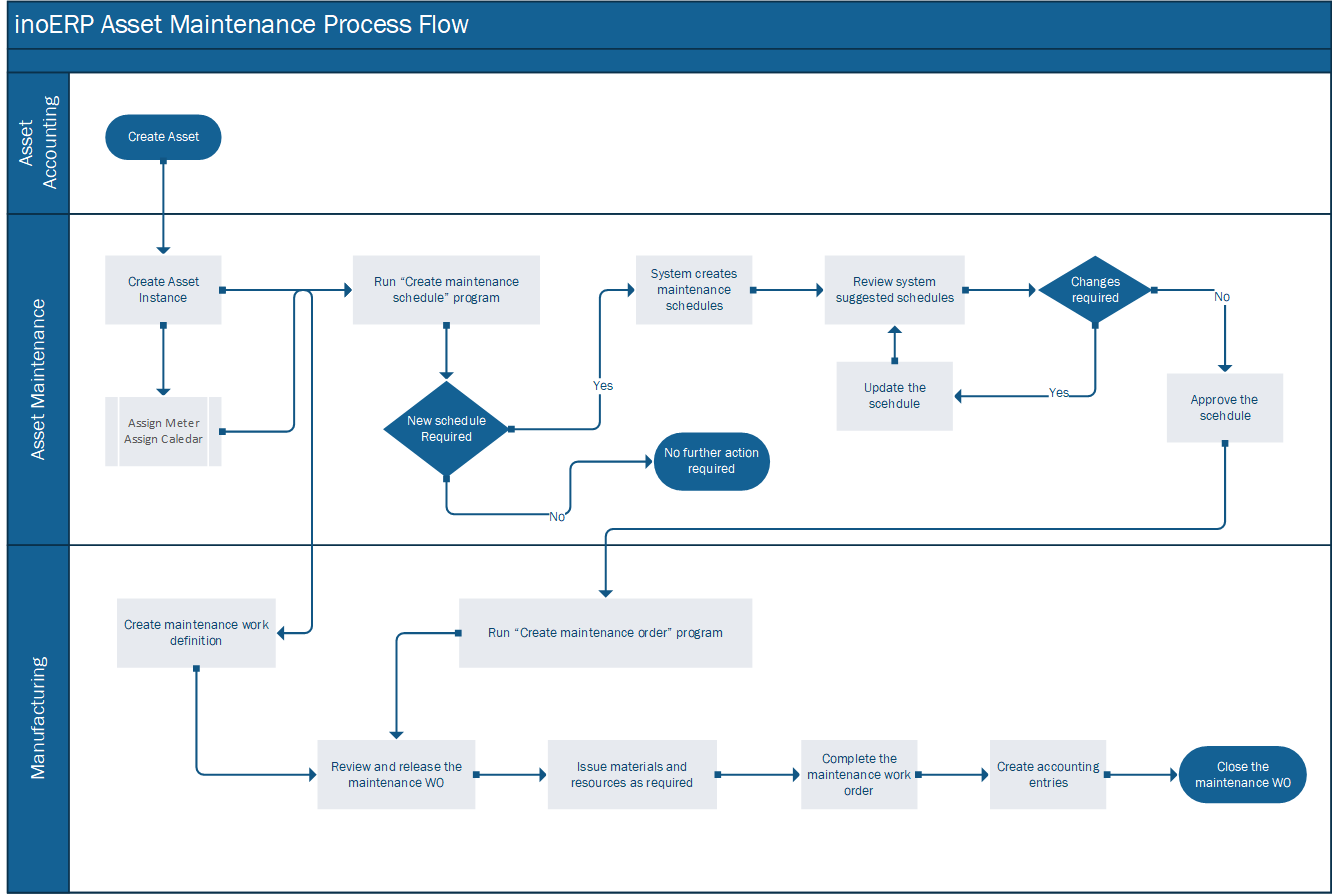
Process Flow
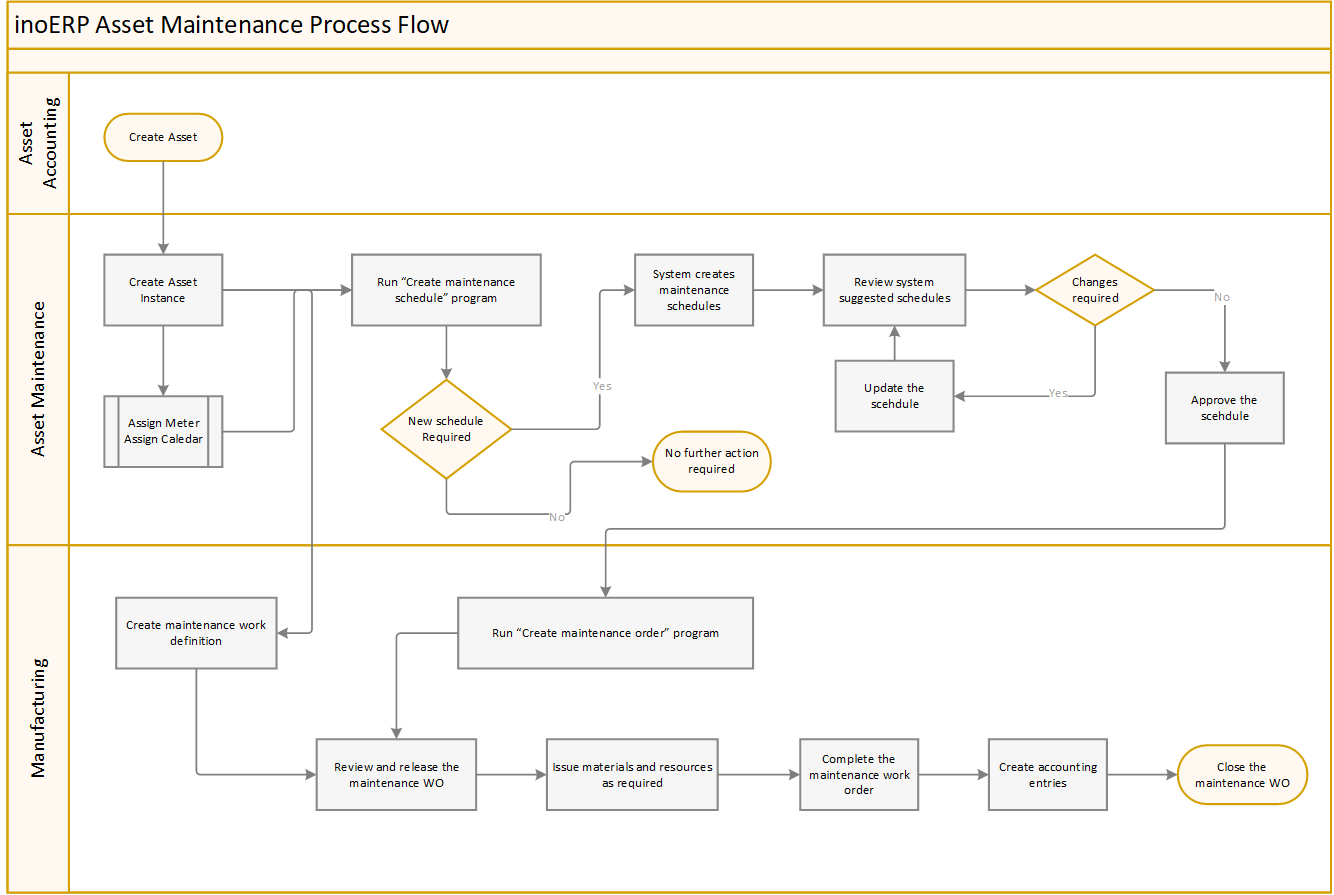
The above process flow is the default process flow for maintaining an asset instance. Depending on the type of asset, and your business needs, you can customize the process flow.
Enhanced Flow
Instance
To create/view/update Asset, navigate to the "Asset" screen from your dashboard/favorite.
Enter the organization/Asset details or any other criteria in the search form and click on the search button to view an existing Asset.
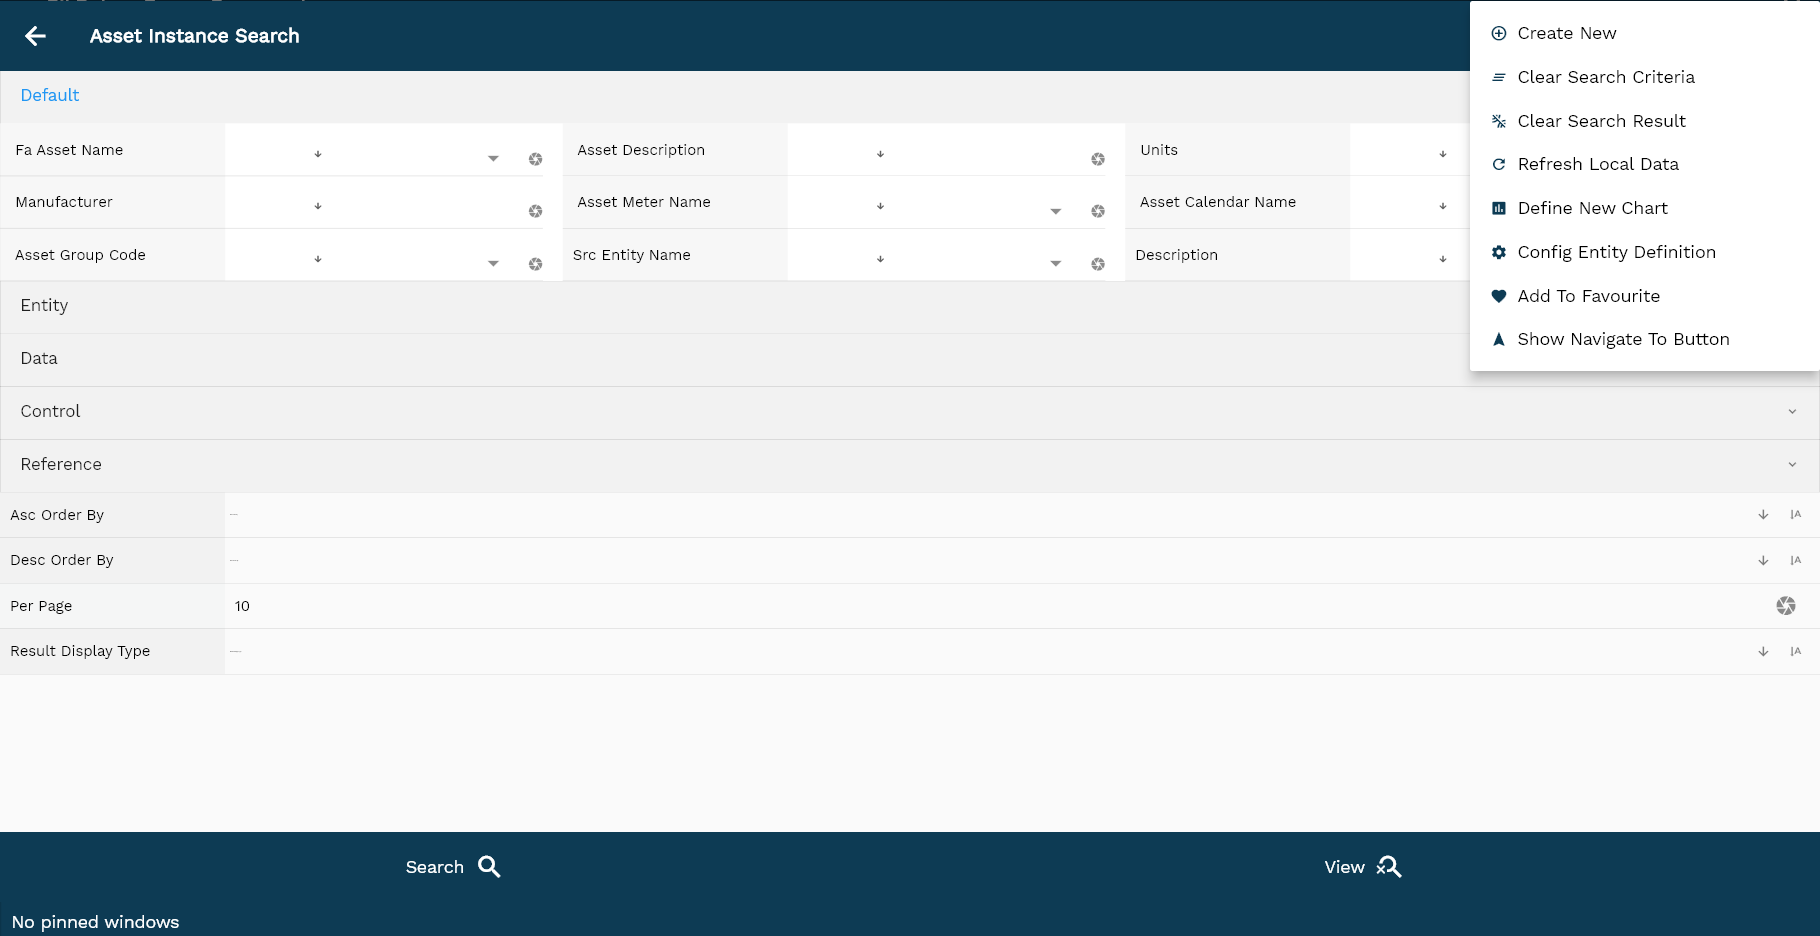
If you don't enter organization details, the system will show you all the Assets. If your organization has configured to make any field mandatory for search, then you have to enter those fields to search Assets.
The application will fetch all the server data and take you to the search result screen. The search result screen looks a bit different on desktop and mobile devices.
If you click on the create a new button, the system will open a simple step form to create a new Asset. You can click on the detail right bottom to view all the fields available for the object.
To view the search result in a table format, click on the table icon in the bottom left corner.

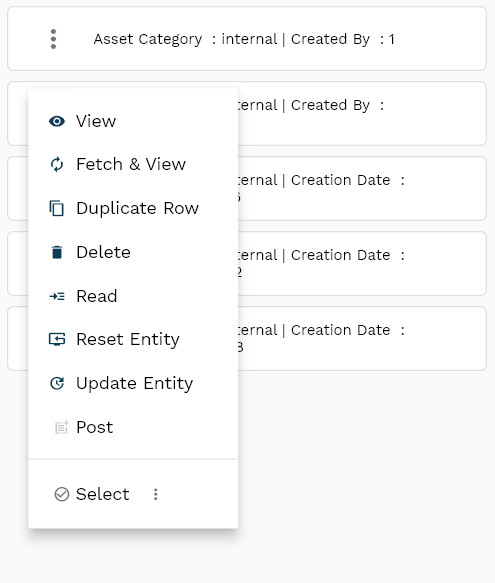
To view specific asset details, click on the menu of that record, and click on view/fetch & view.
You can also click on the expand icon against any item on the search result screen to view the Asset header details, such as price list name, module, status, currency, etc.

The system will fetch all the selected document detail line data. The document details are shown on the search result screen or a separate screen, depending on the device size.
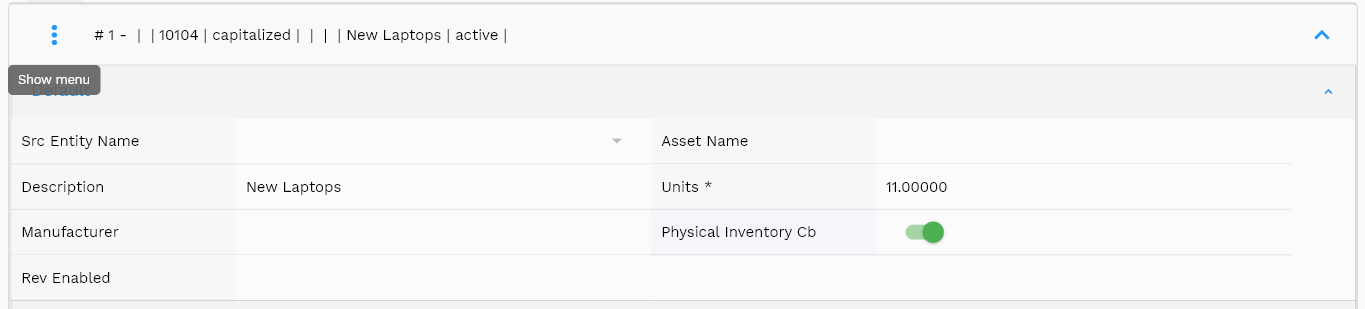
Asset Number: Select a fixed asset number from the list. The asset instance is created with reference to the selected fixed asset number.
Asset Name: A read-only field that displays the name of the fixed asset. The system shows the value as defined in the fixed asset master.

Instance Number: Enter a meaningful, unique number for the asset instance.
Inventory Organization: Select an inventory organization from the list. Inventory organization is a mandatory field for asset instances.
Meter Name: Select a meter name from the list. A Meter name is required if you want to create preventive maintenance schedules against a meter reading for the asset instance.
Calendar Name: Select a calendar name from the list. A calendar name is required if you want to create preventive maintenance schedules against a calendar for the asset instance.
Scroll left, right, up, and down to view all the details. The default configuration shows fields in various functional groups, such as
- Finance
- Entity
- Reference
- Data
- Control
- Etc
You can configure the application to show which fields should be shown under which group. You can also create new groups as per your business requirements.
All Fields
| Sequence | Name | Label | InputType | Field Group |
|---|---|---|---|---|
| 10 | vvLegalOrgCode | Legal Org Code | defferedSelect | ENTITY |
| 10 | vvItemNumber | Item Number | defferedSelect | DEFAULT |
| 20 | vvItemDescription | Item Description | defferedSelect | DEFAULT |
| 30 | vvParantAssetName | Parant Asset Name | InputType.text | DEFAULT |
| 40 | vvAssetNumber | Asset Number | defferedSelect | DATA |
| 50 | vvAssetCategory | Asset Category | defferedSelect | DEFAULT |
| 60 | vvSupplierName | Supplier Name | defferedSelect | ENTITY |
| 70 | vvSupplierNumber | Supplier Number | defferedSelect | DATA |
| 80 | vvSupplierSiteNumber | Supplier Site Number | defferedSelect | DATA |
| 90 | vvSupplierSiteName | Supplier Site Name | defferedSelect | ENTITY |
| 100 | faAssetId | Fa Asset Id | defferedSelect | REFERENCE |
| 110 | srcEntityName | Src Entity Name | defferedSelect | DEFAULT |
| 120 | srcEntityId | Src Entity Id | InputType.text | REFERENCE |
| 130 | assetName | Asset Name | InputType.textField | DEFAULT |
| 140 | assetNumber | Asset Number | InputType.textField | DATA |
| 150 | assetType | Asset Type | InputType.select | CONTROL |
| 160 | legalOrgId | Legal Org Id | defferedSelect | REFERENCE |
| 170 | tagNumber | Tag Number | InputType.textField | DATA |
| 180 | serialNumber | Serial Number | InputType.textField | DATA |
| 190 | keyNumber | Key Number | InputType.textField | DATA |
| 200 | description | Description | InputType.textField | DEFAULT |
| 210 | assetStatus | Asset Status | InputType.text | CONTROL |
| 220 | faAssetCategoryId | Fa Asset Category Id | defferedSelect | REFERENCE |
| 230 | units | Units | InputType.textField | DEFAULT |
| 240 | invItemMasterId | Inv Item Master Id | defferedSelect | REFERENCE |
| 250 | parentAssetId | Parent Asset Id | InputType.text | REFERENCE |
| 260 | manufacturer | Manufacturer | InputType.textField | DEFAULT |
| 270 | apSupplierId | Ap Supplier Id | defferedSelect | REFERENCE |
| 280 | apSupplierSiteId | Ap Supplier Site Id | defferedSelect | REFERENCE |
| 290 | modelNumber | Model Number | InputType.textField | DATA |
| 300 | warrrantyNumber | Warrranty Number | InputType.textField | DATA |
| 310 | leaseNumber | Lease Number | InputType.textField | DATA |
| 320 | physicalInventoryCb | Physical Inventory Cb | InputType.switchField | DEFAULT |
| 330 | revEnabled | Rev Enabled | InputType.textField | DEFAULT |
| 340 | revNumber | Rev Number | InputType.number | DATA |
| 390 | glAcProfileHeaderId | Gl Ac Profile Header Id | defferedSelect | REFERENCE |
| 5350 | createdBy | Created By | InputType.text | REFERENCE |
| 5360 | creationDate | Creation Date | InputType.text | REFERENCE |
| 5370 | lastUpdatedBy | Last Updated By | InputType.text | REFERENCE |
| 5380 | lastUpdateDate | Last Update Date | InputType.text | REFERENCE |
Fixed Asset Master
The asset master tab shows the details of the fixed asset. If the fixed asset is created for multiple units, then you must create a separate fixed asset instance for each unit.
All the details in this tab are read-only and for reference only.
Refer to fixed asset master for more details.
Meter Reading
To add/view/update a meter reading, navigate to the "meter reading" tab.

You can enter meter readings for the asset instance either in the meter reading tab or on the meter reading screen.
To generate preventive maintenance schedules against a meter reading, you must assign a meter to the asset instance and regularly enter meter readings. When the reading crosses the threshold defined in the meter reading, the system will generate a preventive maintenance schedule.
Click on the add new entity to add a new line. If a line already exists, click on copy entity to copy all the details. You can enable/disable fields allowed to be copied in the menu configuration.
Meter Reading Value: Enter a numeric value for the meter reading. Currently, the system supports only one meter assignment per asset instance. However, you can add multiple readings for the same meter.

Scroll left, right, up, and down to view all the details. The default configuration shows fields in various functional groups, such as
- Reference
- Control
- Etc
You can configure the application to show which fields should be shown under which group. You can also create new groups as per your inventory requirements.
All Fields
| Sequence | Name | Label | InputType | Field Group |
|---|---|---|---|---|
| 10 | vvAssetName | Asset Name | defferedSelect | DEFAULT |
| 10 | vvAssetNumber | Asset Number | defferedSelect | DATA |
| 20 | vvAssetType | Asset Type | InputType.text | CONTROL |
| 30 | faAssetComponentId | Fa Asset Component Id | InputType.text | REFERENCE |
| 40 | srcEntityName | Src Entity Name | defferedSelect | DEFAULT |
| 50 | srcEntityId | Src Entity Id | InputType.text | REFERENCE |
| 60 | faAssetId | Fa Asset Id | defferedSelect | REFERENCE |
| 70 | componentAssetId | Component Asset Id | InputType.text | REFERENCE |
| 80 | sourceType | Source Type | InputType.textField | CONTROL |
| 90 | componentType | Component Type | InputType.textField | CONTROL |
| 100 | lineNumber | Line Number | InputType.number | DATA |
| 110 | description | Description | InputType.textField | DEFAULT |
| 120 | reference1 | Reference 1 | InputType.text | REFERENCE |
| 130 | reference2 | Reference 2 | InputType.text | REFERENCE |
| 5140 | createdBy | Created By | InputType.text | REFERENCE |
| 5150 | creationDate | Creation Date | InputType.text | REFERENCE |
| 5160 | lastUpdatedBy | Last Updated By | InputType.text | REFERENCE |
| 5170 | lastUpdateDate | Last Update Date | InputType.text | REFERENCE |
Actions
Copy action allows you to copy all the asset details to a new asset. The system creates the new asset with Copy of {{source asset number}} as the asset number.
You should change the asset number to a more meaningful value.
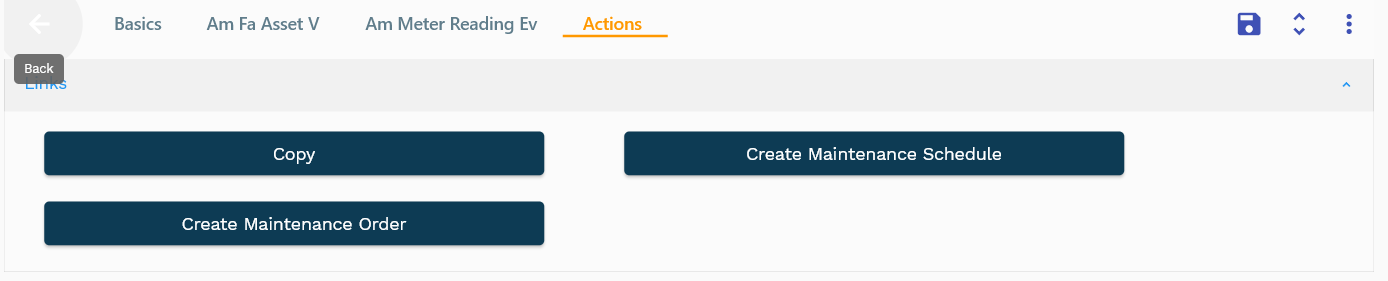
Create Maintenance Schedule: Create a maintenance schedule for the asset instance. The system checks if a maintenance schedule header already exists for the asset instance. If it does, the system will not create a new schedule header. The schedule lines are created per the meter readings/assigned calendar details.
Create Maintenance Order: Converts confirmed maintenance schedules to maintenance orders. This process inserts data into the work order interface table. You must schedule/run the work order import process to create the work order. The maintenance order is created with the below details
- bom_usage_category : Maintenance
- wo_cost_category : Expense
- quantity: 1
- nettable_quantity : 1
- description : Maintenance Order for
{{asset number}} - start_date :
{{start date in the schedule}}